Superboot Quick Start Guide
Contents
Useful Links
Fusing SD Card
The first step is fusing Superboot.bin to the SD Card. This places Superboot, the boot loader, in a location outside of the regular file system, in a position where the board's processor knows exactly where to find it.
WARNING! The app will fuse Superboot to all devices that show up under SD Drive(s), this includes USB drives also.
Things You'll Need
- Windows XP or 7 (8 and 10 are currently untested) with an Administrator account.
- The SD Card Flasher app appropriate for you board. (See link above)
- image/ directory and contents for your board.
- SD Card and Card Reader
Fusing
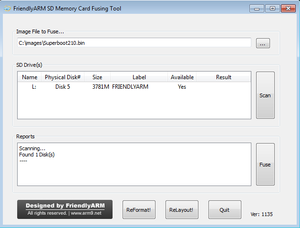
Step 1. Right click on SD-Flasher-210-20140224.exe (Or what ever the name was for your board) and choose Run as Administrator (if applicable to your Windows version)
Step 2 Click Image File to Fuse and navigate to your images/ directory and choose Superboot{number}.bin
Step 3 Click the Scan button, you should see your SD Card listed. If none are listed, check you have Administrator rights. If multiples are listed, unplug the ones you do not want fused, as the program will fuse all that are found.
Step 4 Click the Reformat! button, which should take a few seconds and once done rename your SD Card partition FriendlyARM
Step 5 Click the Fuse button, it should only take a second. In the SD Card list your car should say Yes under Available and Succeed under Result. If not close program and try these steps again.
Step 6 Copy the images/ directory to the SD Card, it must be in the root of the card. If you have no edits to make, you can proceed to flashing the firmware to your board.
SD Card File Structure
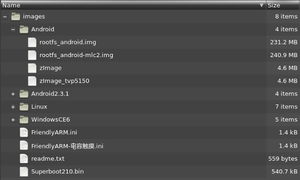
The images/ directory found in the source archive contains the OS and bootloader that need to be flashed to your board for it to operate. This is also what you will use when creating your own custom OS.
- images/ The main directory holding all the firmware files, put to the root of the SD Card.
- images/FriendlyARM.ini The configuration file that tells Superboot which files to install on the board.
- images/Superboot{number}.ini Bootloader to be installed, it is best this is the same version as fused to the SD Card.
- images/ {Android/ | WindowsCE6/ | Linux/} Directories containing that respective Operating System firmware.
The names of the directories holding the Operating Systems should remain as is, the files inside those directories can be changed to something more descriptive such as during develeopment of custom firmware. But remember to edit FriendlyARM.ini to reflect those changes.
FriendlyARM.ini
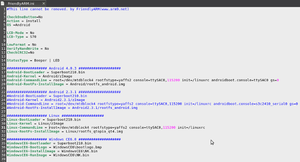
This is the config file that tells Superboot what to install, and where to find it. There are several options for this file, which can be found here Superboot#FriendlyARM.ini_Options. The main option you will need to configure at first is which Operating System you would like to install.
Opening with a text editor, near the top of the file you will see these two options.
   ....
   Action = Install
   OS = Android
   ....
Make sure Action = Install. OS should be set to the Operating System you want, options being.
- Android
- Linux
- WindowsCE6
For older versions of the firmware you may also need to set the LCD-Type to which LCD you are using (S70, A70, W35, etc), but the newer firmware automatically figures out which LCD is attached.
For custom firmware, example a custom kernel you would change Linux-Kernel = Linux/zImage to Linux-Kernel = Linux/zImage.custom.
You can also change Kernel command line options for Android and Linux depending on your requirements.


