Difference between revisions of "4418:eFlasher"
From ARMWorks
(→Flashing to eMMC with eFlasher) |
(Added eFlasher section, moved sd card section to separate page.) |
||
| Line 7: | Line 7: | ||
* 8GB or larger SD Card | * 8GB or larger SD Card | ||
| − | == | + | == Flash eFlasher to SD Card == |
| − | |||
* Download and extract s5p4418-eflasher-sd8g-xxxxxxxx-full.img.zip | * Download and extract s5p4418-eflasher-sd8g-xxxxxxxx-full.img.zip | ||
| − | * | + | * Follow [[SDCard_Flashing]] (your.img will be s5p4418-eflasher-sd8g-xxxxxxxx-full.img) |
| − | |||
| − | |||
| − | |||
| − | |||
| − | |||
| − | |||
| − | |||
| − | |||
| − | |||
| − | |||
| − | |||
| − | |||
| − | |||
| − | |||
| − | |||
| − | |||
* Once done you should see three partitions mounted in your file browser, boot, FriendlyARM, rootfs | * Once done you should see three partitions mounted in your file browser, boot, FriendlyARM, rootfs | ||
* Eject SD Card and place it in the 4418 SD Card slot. | * Eject SD Card and place it in the 4418 SD Card slot. | ||
| Line 39: | Line 22: | ||
* You'll be asked to select an OS, click the one you want: | * You'll be asked to select an OS, click the one you want: | ||
[[Image:EFlasher_Start_Screen.jpg |600px]] | [[Image:EFlasher_Start_Screen.jpg |600px]] | ||
| + | |||
* It will then display some information about that image, click next: | * It will then display some information about that image, click next: | ||
[[Image:EFlasher_Ready_to_Go_Screen.jpg |600px]] | [[Image:EFlasher_Ready_to_Go_Screen.jpg |600px]] | ||
| + | |||
* Installation will now begin. | * Installation will now begin. | ||
[[Image:EFlasher_Installing_Screen.jpg | 600px]] | [[Image:EFlasher_Installing_Screen.jpg | 600px]] | ||
| − | * | + | |
| + | * Install is now finished. | ||
| + | [[Image:EFlasher_Finish_Screen.jpg | 600px]] | ||
| + | |||
| + | * Click finish, move boot switch to eMMC position, and reboot. | ||
Latest revision as of 23:51, 26 April 2017
Boards with the Samsung 4418 SoC and onboard eMMC, such as the [Smart4418], can use the eFlasher utility to load the Operating System directly to the onboard eMMC.
What You'll Need
- FriendlyElec Downloads s5p4418-eflasher-sd8g-xxxxxxxx-full.img.zip
- If you are setting up the SD Card with Windows:
- FriendlyElec Downloads win32diskimager.rar
- 8GB or larger SD Card
Flash eFlasher to SD Card
- Download and extract s5p4418-eflasher-sd8g-xxxxxxxx-full.img.zip
- Follow SDCard_Flashing (your.img will be s5p4418-eflasher-sd8g-xxxxxxxx-full.img)
- Once done you should see three partitions mounted in your file browser, boot, FriendlyARM, rootfs
- Eject SD Card and place it in the 4418 SD Card slot.
Flashing to eMMC with eFlasher
Once you have successfully flashed the eFlasher image to your SD Card, you can boot up your board and install the OS of your choice.
- Put boot select switch in the SD Card position.
- Power on the board, it will boot like a normal Linux OS with messages on the screen.
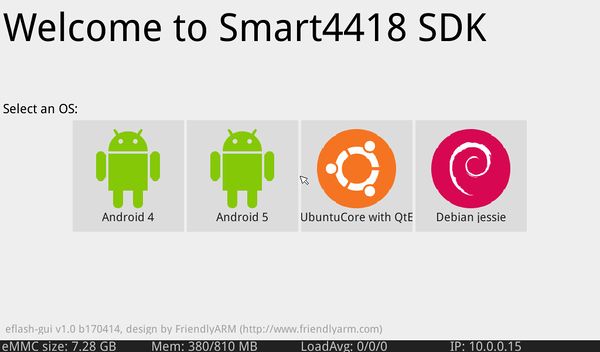
- You'll be asked to select an OS, click the one you want:
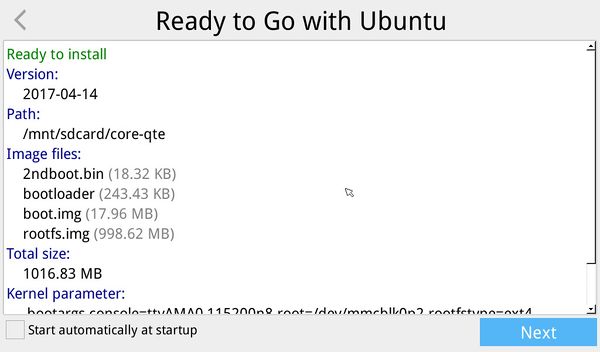
- It will then display some information about that image, click next:
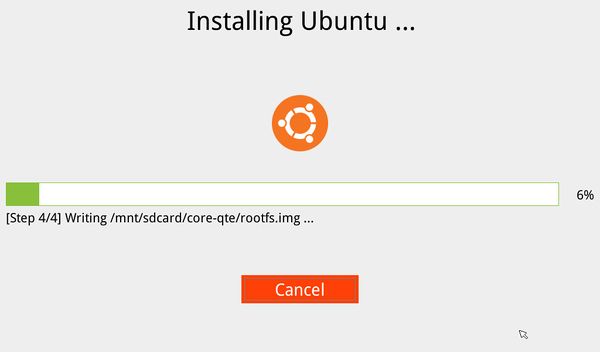
- Installation will now begin.
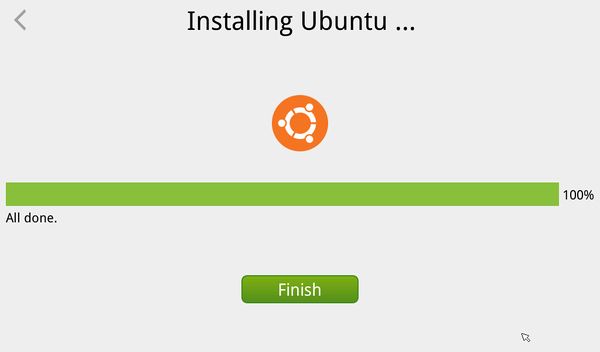
- Install is now finished.
- Click finish, move boot switch to eMMC position, and reboot.


