Difference between revisions of "SDCard Flashing"
From ARMWorks
(Created page with "This guide will help you flash an img file to an SD Card, using Linux or Windows. * your.img should be replaced by the file's actual name. == Prepare SD Card == === Linux ==...") |
(Added Windows Win32DiskImager Section) |
||
| Line 23: | Line 23: | ||
* Once done, you should see the SD Card partitions listed in the file browser. | * Once done, you should see the SD Card partitions listed in the file browser. | ||
| + | |||
| + | === Windows === | ||
| + | A Windows application is available for making your SD Card from an img file. | ||
| + | * [https://www.mediafire.com/folder/ilkcy37otd7il/NanoPi2Board Download] win32diskimager.rar | ||
| + | |||
| + | * Extract and run win32diskimager (May help to Run as Administrator) | ||
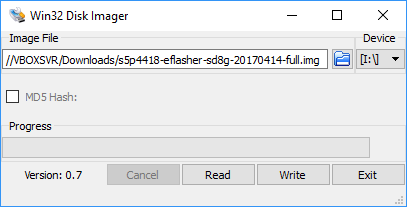
| + | * Select the img file and SD Card you wish to use. | ||
| + | [[Image:DiskImager_Open_Img_File.png]] | ||
| + | |||
| + | |||
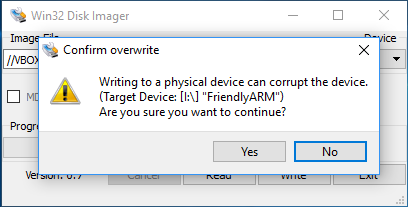
| + | * Select Write, and confirm overwriting the SD Card. | ||
| + | [[Image:DiskImager_Confirm_Overwrite.png]] | ||
| + | |||
| + | |||
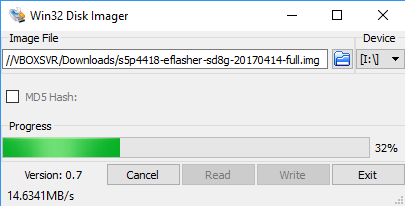
| + | * Depending on the img size, this could take some time. | ||
| + | [[Image:DiskImager_Write_Progress.png]] | ||
| + | |||
| + | |||
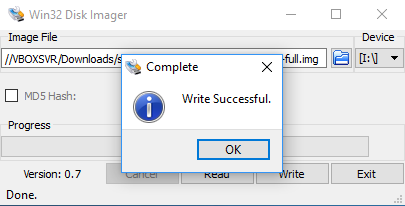
| + | * Flashing img to SD Card is now finished, click okay and eject SD Card. | ||
| + | [[Image:DiskImager_Finished.png]] | ||
Latest revision as of 04:37, 27 April 2017
This guide will help you flash an img file to an SD Card, using Linux or Windows.
- your.img should be replaced by the file's actual name.
Prepare SD Card
Linux
- Open terminal and navigate to where you downloaded and extracted your.img.
- Insert SD Card and run dmesg in the terminal to determine the device name /dev/sd[a-z]
Example dmesg output showing SD Card at /dev/sde with 3 partitions, 1, 2, 3:
   [22232.456556] sd 6:0:0:1: [sde] 15523840 512-byte logical blocks: (7.95 GB/7.40 GiB)
   [22232.459057]  sde: sde1 sde2 sde3
Warning: This will delete all data on the SD Card! And any drive you point it to, so double check the device path.
Run following commands in terminal (umount all partitions, do not use file explorer to eject them.):
   sudo umount /dev/sd[a-z][Partition Number]
   sudo dd if=your.img of=/dev/sd[a-z] bs=512
This will take some time to complete, be patient.
- Once done, you should see the SD Card partitions listed in the file browser.
Windows
A Windows application is available for making your SD Card from an img file.
- Download win32diskimager.rar
- Extract and run win32diskimager (May help to Run as Administrator)
- Select the img file and SD Card you wish to use.
- Select Write, and confirm overwriting the SD Card.
- Depending on the img size, this could take some time.
- Flashing img to SD Card is now finished, click okay and eject SD Card.


